There are a ton of shows out there that I’m crazy about. And then there are the few shows that I’m CRAZY about. Those are the ones that truly define who I am and never fail to make me smile. They’re also the ones I obsess over to the point where it’s probably unhealthy. Pokémon is one of those shows. (Particularly Indigo League.) After watching it over and over all of these years, I still can’t get sick of it. I love the show. I love it as much as…as much as…as much as Pikachu loves ketchup!
Man, that really takes me back. All the way back to Dark City when the Yas and Kaz Gyms were in the middle of a gang war over becoming an official Pokémon Gym. When Ash, Misty, and Brock enter the city, they’re puzzled by its ghost town appearance and a woman’s fear of Pokémon trainers. Before Ash and friends have a chance to do anything, they encounter some rock-throwing kids who dislike anyone who works with Pokémon. Fortunately, a friendly restaurant owner steps in and invites Ash and Co. inside and explains the city’s situation. Since they’re in a restaurant, they might as well eat. Ash is served up some tasty looking omurice, but it doesn’t stay pretty for long. Pikachu is just loving a bottle of ketchup and when Ash asks Pikachu to pour some on, Pikachu is happy to share the good stuff. And by share I mean dump on enough that you can’t see the omurice anymore and Ash has to take the ketchup away from Pikachu. (Which Pikachu quickly wrestles back from Ash.)
Recipe makes 2 servings.
Ingredients
Fried Rice:
1 tablespoon butter
½ cup onion, finely chopped
½ cup mixed vegetables, finely chopped (I use a mix of peas and carrots, but use whatever you like.)
4 ounces chicken, cut into bite-sized pieces
1 cup cooked rice
1 tablespoon soy sauce
2 tablespoons ketchup, plus more for decoration
Salt
Pepper
Omelettes
4 large eggs
4 tablespoons heavy cream or milk
Salt
Oil or Nonstick Cooking Spray
Directions
Fried Rice:
Melt butter in a large skillet over medium-high heat. Add the onions and vegetables and cook until onions become translucent and vegetables begin to soften. Add the chicken, salt, and pepper. Once the chicken is fully cooked, add the rice and soy sauce and stir until any clumps of rice have been broken down and the ingredients are thoroughly mixed. Add the ketchup and mix until the ketchup is evenly distributed throughout the rice. Adjust seasonings and remove from heat and set aside.
Omelettes:
In a medium bowl, whisk together eggs, cream or milk, and a pinch of salt.
Putting It All Together:
Heat oil in a 10-inch nonstick pan over medium-high heat. Pour in half the egg mixture and tilt the pan to evenly spread it. When the bottom of the egg has set but the top is still runny, reduce the heat to low. Spread half of the fried rice in the middle of the omelette. Fold the left and right sides of the omelette over the rice. Move the omurice to the edge of the pan and flip it onto a plate. Cover the omurice with a clean towel and shape it into an oval. Repeat with the remaining ingredients. Drizzle the omurice with ketchup (Or drown it if you’re like Pikachu!) and serve!
So maybe the omurice doesn’t look as pleasing after Pikachu’s through with it, but I’m sure it’s still delicious. I tend to be a bit heavy-handed with the ketchup myself. It’s good for everything, except aliases. But “Tom Ato” isn’t very good either. (Don’t get me started on “Ann Chovy” and “Caesar Salad.”) Ash should’ve picked a better name, but that’s not what’s important. What’s really important is that the Yas and Kaz Gyms know that it’s wrong to use Pokémon for street fighting. And the kids finally realize what I’ve known most of my life: Pokémon are the coolest, especially Pikachu.
Episode: Together in the Minefield Hamburger Steak with a Fried Egg
Are you aspiring to break into showbiz to get revenge on the man who wronged you? Are you missing the most important human emotion? Is your name Kyoko Mogami? Then do we have an opportunity for you! Here at LME’s Love Me section (Yes, that’s “Love Me” as in “Please love me!”) you’ll perform a variety of tasks as you work to get others to love you while developing your own ability to respect and think of others. There will even be opportunities to appear on TV! And this journey is based on a points system, so if you put your heart into it and your performance is excellent, a full debut backed by our very own agency is in your future! How can this get any better? A lovely uniform! It’s got the Love Me logo printed on the front left side and back making it both stylish and gorgeous. And don’t worry. This may be a new section, but you won’t be alone for long. There are other love-lacking talents who will be joining you in the future. What do you say?
Sounds pretty crazy right? But that’s Lory Takarada for you. He’s just about as eccentric as they come. No he never presented the Love Me Section to Kyoko as horribly as I just did, but he put a lot of effort into this section and came up with everything from the name to the shocking, pink eyesore of a uniform. Nothing is ever easy when it comes to showbiz, so making it into LME is just the beginning of Kyoko’s quest to defeat/kill Sho Fuwa. Yeah, revenge is an unusual motive to get into the entertainment industry and she does get in trouble for it. Ren Tsuruga quickly becomes her enemy because he holds acting to a high, practically sacred standard and finds her reason for studying acting disgusting. But things change as Kyoko gains more experience and finds that she really loves acting and wants to use it to realize her true self. One of her most memorable Love Me duties is when she takes on the role of Ren’s manager. When Yashiro gets sick, Kyoko is called on to substitute. Basically to make sure Ren eats properly. Ren never makes a big deal about food and thinks that quick snacks from convenience stores are good enough. (“I had some nourishing rice.”) Supervisor Matsushima figured Ren would never let a girl eat by herself, so he’d be forced to eat something real. During their busy day (It’s actually after 7pm and they’re still running.) Kyoko’s stomach starts growling and Ren asks her what she wants to eat. Kyoko says whatever Ren likes is fine, so of course, Ren suggests boiled frogs, forcing her to say what she really wants. (I’ve been in that situation tons of times.) So Kyoko immediately shouts that she wants a hamburger steak with a fried egg it. Not long afterwards, they find themselves at a family restaurant with a hamburger steak in front of each of them. And I find myself running to the kitchen to try and make one.
Recipe makes 3 hamburger steaks.
Ingredients
Hamburger Steaks:
1 pound ground beef and pork (I like using a ½ pound of each.)
3 tablespoons vegetable oil
1 small onion, finely chopped
1 clove garlic, minced
1 large egg
1/3 cup panko
2 tablespoons milk
1 teaspoon salt
½ teaspoon pepper
¼ teaspoon freshly grated nutmeg
Sauce:
2 tablespoons butter
½ cup red wine
½ cup ketchup
½ cup beef broth
½ cup Worcestershire sauce
Fried Eggs:
2 tablespoons butter
3 large eggs
Salt
Directions
Heat 1 tablespoon of vegetable oil in a small skillet over medium heat. Add onions and cook until soft and translucent. Add garlic and cook for 30 seconds. Remove from heat and set aside to cool completely.
In a large bowl, combine the egg, panko, milk, salt, pepper, and nutmeg. Add the onion and garlic and meat and mix until combined.
Divide the meat into 3 equal portions. Toss each portion from one hand to the other about 10 times. This will help prevent the steaks from breaking while cooking. Shape the portions into large, flat ovals about the size of your hand. Make the centers a little thinner or indent them with your fingers since the centers tend to swell while cooking. Refrigerate the hamburger steaks for at least 30 minutes. Allow them to come to room temperature before cooking.
Heat the remaining 2 tablespoons of oil in a large pan over medium heat. Place a hamburger steak in the pan and cook until well browned, about 4 minutes. Flip the hamburger steak and cook another 4-5 minutes or until the internal temperature reads 155-160 degrees. Remove the hamburger steak and repeat with the others.
Make the sauce by combining red wine, ketchup, beef broth, and Worcestershire sauce in a medium bowl. Melt butter in the same pan used to cook the hamburger steaks. Add the red wine mixture and simmer until the sauce begins to thicken. Skim off the fat. Add the hamburger steaks to the sauce and cook for about two minutes. Remove the hamburger steaks and skim off any leftover fat or chunks from the sauce. Pour into cups for dipping.
Fried Eggs:
Melt 2 tablespoons of butter in a medium pan over medium-high heat. Once the butter starts bubbling, crack the eggs and add them to the pan, one at a time. Immediately reduce the heat to low and cook until the whites are completely set but the yolk is still soft, 1-2 minutes. Remove from heat and season.
Putting It All Together:
Plate your hamburger steaks and cover with fried eggs. Serve with vegetables of your choice and dipping sauce. Enjoy!
Variations:
There are many names for a Japanese hamburger steak and even more ways to make them. Whether it’s called a hamburger, hamburger steak, or hambāgu, it’s delicious. This is my take on a basic one, but you can always use a different meat mixture, shape them differently, or use a Teriyaki or other sauce.
I can understand Kyoko’s obsession with hamburgers. You won’t find me picking up rocks that look like hamburgers or speaking to His Majesty, King Hamburger, (Okay, maybe you will.) but for sure you’ll find me requesting hamburger steaks whenever I get the chance. And even though being Ren’s manager doesn’t go the smoothest, at least Kyoko gets to have a yummy hamburger after many months without one. The girl needs it considering her role as manager just gets tougher as she deals with studying for her high school entrance exam and taking care of Ren when he catches a cold. But she makes it through and almost gets herself 100 points. (Ren’s 10 point deduction is too cruel.) You know what else is cruel? Skip Beat! is only 25 episodes long! There are new roles and new faces that just have to be animated. Not to mention food. (Maui Omurice, Okonomiyaki Anpan, Anything Kyoko/Kuon makes for Kuu.) Well, I’ll just keep sitting here hoping and praying for more episodes, but at least I’ve got a hamburger steak with a fried egg on it to keep me company.
Just like many other girls of the 90’s, my cousin, sister, and I were all super fans of Sailor Moon. We incorporated the show in just about every aspect of our lives. We watched it every weekday, collected the toys and books, and ran around pretending we were Sailor Scouts. (Over the years, I’ve gotten into the bad habit where I use names, quotes, and phrases from the original and English adaptation interchangeably, so please bear with me.) In case you’re wondering, I always played Sailor Venus. I wanted to be Sailor Moon, but my cousin got dibs because she was a year older than me. We considered ourselves experts who had seen and done everything Sailor Moon until we took a gander in one of my local video stores and found the movies. They completely blew us away and we watched them every time we had a sleepover. I even forced all my friends to watch Black Dream Hole at one of my birthday parties. Unfortunately, none of my friends were into Sailor Moon and I passed out pretty quickly, (Watching movies in the dark always make me sleepy.) so I think I left all of my friends bored and/or confused. (Ouch.) At least I managed to stay up long enough to catch the girls making cookies. Although I prefer watching the girls kick butt, it’s great seeing them just be themselves. I always wanted to have friends that liked to hang out and bake and be study buddies.
Watching it now, it seems like I’d fit in just fine with the Sailor Scouts. Every time I open a bag of chocolate chips, I end up eating at least a handful. (Just checking them for freshness.) And whenever something I bake turns out right, I turn very much into Serena. “Look how beautiful and unburnt my cookies are!” Yeah, I’m not perfect. Now I’ve got a good butter cookie recipe that should work just fine to make sweet, little bunny and heart cookies like Usagi’s. Unlike her’s though, I’m pretty sure mine will taste great!
Recipe makes 90 cookies, depending on the size.
Ingredients
½ cup (1 stick) butter, room temperature
½ cup sugar
1 egg, beaten
¼ teaspoon vanilla extract
1 1/8 cups flour
½ teaspoon cream of tartar
¼ teaspoon baking soda
Directions
In a medium bowl, sift and combine flour, cream of tartar, and baking soda.
In a stand mixer, beat butter and sugar on medium speed until light and fluffy, about 1-2 minutes. Beat in the egg and vanilla extract. Slowly add the dry ingredients and mix until combined. Divide the dough in two and flatten each half into a disk. Cover each disk with plastic wrap and chill in the refrigerator for at least 1 hour.
Lightly dust a counter with flour and roll out a disk to ¼-inch thickness. Cut out shapes with any similar-looking cookie cutters or make stencils and cut out with a paring knife. Re-roll and cut until you run out of dough and continue this process with the other disk. The dough will become more difficult to work with as it warms up, so you may need to chill it for a short time before continuing to cut. Use a toothpick or skewer to poke holes into the bunny cookies for eyes. If you want to use sprinkles for the eyes, you can place them in now or do it right when the cookies come out of the oven. Place the cookies on their sheets in the refrigerator to chill for 30 minutes.
Preheat oven to 375 degrees F.
Place cookies in the oven and bake, rotating trays halfway through, until the cookies have browned slightly, 10-15 minutes. Transfer the cookies to a wire rack and allow them to cool completely. Now they’re ready for eating!
I think my cookies are cute and they don’t taste a thing like Serena’s cardboard cookies. (Thank goodness.) I do try to make all my food with love, so maybe that’s what I taste. Or it’s just the butter and sugar. I don’t expect my cookies to aid in saving the planet from evil like the Black Dream Hole, (These aren’t Chibi-Usa’s hundred fold courage and power cookies.) but if I can make someone happy when they eat one, then I’ve done my job. Yeah, it’s a far cry from being the Champion of Love and Justice, but I’ve got to start somewhere.
I’ve been watching cartoons from all over the world my entire life, but for some strange reason, I had trouble wrapping my head around that fact. I just assumed that all cartoons were made in America, even though I knew that many of them had ties to other countries. When I was 12, I was introduced to Adult Swim’s anime library and finally everything clicked into place. I realized the differences between animation from country to country and truly began to not just watch cartoons, but respect them. Two of the shows that left a lasting impression on me were Lupin the 3rd (I started off with Part II, but I love them all.) and Case Closed/Detective Conan. Thieves and detectives were already in my wheelhouse, so there was no way that I’d not like them. Many years and hundreds of episodes later, I’m still hopelessly in love with these series. And just when I thought it’d be impossible for me to love them anymore than I already did, they made a crossover. And then they did it again! I was so excited, I screamed. It’s a good thing that the movie has subtitles because I giggle so much when I watch it that people have trouble hearing what’s being said.
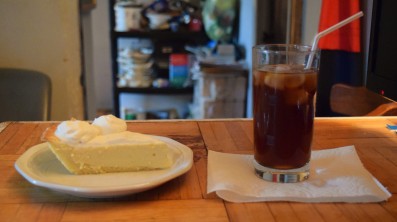
The giggles get even worse when it’s just Conan and Jigen together. “Papa’s sorry.” is my favorite line in the entire movie. I’d love a special with just the two of them. During the course of their little one-on-one at the hotel, Jigen orders Conan an iced coffee and he’s given a piece of lemon pie. After all, he looks like a nice little kid who’s just picking up his Papa. Conan/Shinichi loves lemon pie and iced coffee, so it’s tough for him to pass up. There’s a large percentage of myself that’s made up of pie and iced coffee, so I totally get it.
Recipe makes one 9-inch pie.
Ingredients
Crust:
1 ¾ cups cake flour
1 cup powdered sugar
1/8 teaspoon salt
½ cup (1 stick) butter, cold and cut into chunks
1 large egg
Filling:
2 (14 ounce) cans of sweetened condensed milk
3 egg yolks
¾ cup fresh lemon juice, from 3-4 lemons (You can use either Meyer lemons or regular ones.)
1/8 teaspoon salt
Whipped Cream:
1 cup heavy whipping cream
2 tablespoons sugar
½ teaspoon vanilla extract
Iced Coffee:
Coffee-beans or ground (I know it’s vague, but people have their own preferences when it comes to amount and flavor.)
Ice
Directions
Iced Coffee:
Use a scale to measure out enough ice to equal half of the total liquid volume. My iced coffee was 8 ounces, so that means I measured out 4 ounces of ice. Measure out and grind the amount of coffee you want. Brew your coffee directly over ice. I’m a cheater and I filled a heat-safe glass with the 4 ounces of ice, added a little sweetener, and brewed straight into it using my Keurig. I added more ice afterwards.
Crust:
In a food processor, pulse cake flour, powdered sugar, and salt until combined. Add butter and pulse until mixture resembles coarse crumbs. Add the egg and pulse until dough just comes together when pressed. If the dough is too dry, add ice water, 1 teaspoon at a time, and pulse again. Form dough into a disk and cover in plastic wrap. Let dough chill until firm, 30 minutes to an hour.
Unwrap dough and place on a lightly floured surface. Roll out dough anywhere from 10 to 14 inches across and place in a pie tin. Gently press dough into place. Trim excess dough or fold it back on itself. Chill for 30 minutes.
Preheat oven to 450 degrees F.
Place parchment paper over the crust and fill the crust with pie weights, dried beans, or something similar. Bake the crust until set and beginning to brown, 10 minutes. Remove the parchment and weights and let cool.
Filling:
In a large bowl, whisk together egg yolks, sweetened condensed milk, and salt until well combined. Gradually whisk in lemon juice.
Whipped Cream:
Chill a metal bowl and whisk in the freezer for 10 minutes. I just used the ones from my stand mixer. Pour the heavy cream into the bowl and add the sugar and vanilla extract. Whisk until the cream just forms stiff peaks.
Putting It All Together:
Preheat oven to 350 degrees F.
Pour filling into crust. Bake until the filling is just set, 15-20 minutes. There should still be some jiggle in the middle. Remove from the oven and let cool completely on a wire rack. Chill the pie for at least 3 hours.
Top pie with whipped cream. You can chill the pie again for up to an hour or go ahead and serve with a glass of iced coffee!
I’ve never made a lemon cream pie before, but after tasting it, I’ll never be able to live without it. I feel the same way about this movie and the individual franchises. If only detecting and thieving were as easy and fun as Conan and Lupin make them look. I’d stop what I’m doing right now and go pursue one of those careers. Or both. I can’t decide which I like better, even though one of them is against the law. Maybe I’ll just meet them somewhere in the middle and become like Inspector Zenigata. (On second thought, maybe not.)
Episode: My Chocolate / Ore no Chokorēto Takeo’s Valentine’s Day Chocolate
Hooray for Valentine’s Day! It’s the season of love and hearts and pink and chocolate! I’ve always loved this holiday. Not for the romance, but for the fact that I can shape all of my food into hearts and no one will look at me funny. Plus giving chocolates to people you love is fun. (Especially if you get some in return!) See, there’s that “L” word again. I’ve used it three times already. Since LOVE is what Valentine’s Day boils down to, what better love story to feature than My Love Story!! (Just look at that title.)
Takeo and Rinko love each other so much, but they’re always on the wrong page. They don’t think they deserve each other, but they don’t want to lose one another either. The series is so sugary sweet it makes my teeth hurt. It’s also so funny that I have trouble breathing. (Literally. I was wheezing after the plastic wrap thing.) The show is after my own heart. And stomach. Every time Rinko turns around, she’s got another mouth-watering dessert for Takeo. Valentine’s Day is no exception. Actually, she outdoes herself by making a monstrous chocolate tower. And that’s after teaching her friends how to make chocolate cookies and having a Valentine’s Day get-together with the boys. How she found the time to pull this off astounds me.
Recipe makes 1 tower of chocolatey goodness
Ingredients
Cake:
2 large eggs, separated
¼ cup + 2 tablespoons sugar
½ cup cake flour, sifted
1 ½ tablespoons butter
2 tablespoons milk
2 tablespoons cocoa powder, sifted
¼ teaspoon vanilla extract
1/8 teaspoon salt
Chocolate Mousse:
5 ounces milk or semi-sweet chocolate, coarsely chopped or melting wafers
1 tablespoon butter
2 large eggs, separated
½ teaspoon vanilla extract
½ cup heavy cream
White Chocolate Mousse
6 ounces white chocolate, coarsely chopped or melting wafers
½ teaspoon vanilla extract
¾ cup heavy cream
Chocolate Truffles:
5 ounces milk or semi-sweet chocolate, coarsely chopped or melting wafers
1 ½ tablespoons butter
¼ cup heavy cream
Chocolate Cigarettes and Other Shapes
½ pound milk or semi-sweet chocolate, coarsely chopped or melting wafers
½ pound dark chocolate, coarsely chopped or melting wafers
1 pound white chocolate, coarsely chopped or melting wafers
Pink food coloring
Yellow food coloring
Strawberries for Garnish
Directions
Cake:
Preheat the oven to 350 degrees F.
Grease a deep 6-inch round cake pan
Whip egg whites in a stand mixer on medium-high speed until smooth. Add sugar 2 tablespoons at a time while continuing to whip. Once the egg whites are glossy and form stiff peaks, beat in egg yolks until incorporated. Use a spatula to fold in cake flour. Heat butter and milk until the butter melts. Pour this into a small bowl. Add cocoa powder and salt to butter and milk and stir until dissolved. Stir in vanilla extract. Fold this into the batter, a little at a time, until fully incorporated without overmixing. Pour cake batter into prepared pan and gently tap or drop on the counter to remove air pockets. Bake for 30-40 minutes or until a skewer comes out clean when the cake is tested. Tap the pan on the counter again and cool upside down for 10 minutes. Remove cake from pan and wrap completely in plastic wrap. This will help keep your cake moist. Cool completely on a baking rack.
Chocolate Mousse:
Slowly melt chocolate in a double boiler or a bowl over a pot of simmering water. Stir in butter and egg yolks, one at a time, until incorporated. Remove from heat, add vanilla, and allow to cool slightly. Whip the egg whites in a stand mixer on medium-high speed until stiff peaks form. Fold egg whites into chocolate mixture. Whip heavy cream in a stand mixer until stiff peaks form. Fold whipped cream into the chocolate mixture until combined. Move mousse to the refrigerator and allow it to chill until it is set. If it’s still not solid enough to pipe, whip in a stand mixer until stiff.
White Chocolate Mousse:
Heat the heavy cream in a saucepan over medium heat until on the verge of boiling. Add the white chocolate and whisk until melted and incorporated. Remove from the heat and whisk in the vanilla extract. Chill mousse in the refrigerator for at least an hour or until it begins to set. Transfer mousse to a stand mixer and whip until stiff.
Chocolate Truffles:
Melt chocolate in a double boiler or a bowl over a pot of simmering water. Stir in the butter until melted and incorporated. Set aside. Heat the heavy cream in a saucepan over medium heat until on the verge of boiling. Remove from heat and add to chocolate. Stir together until combined. Pour chocolate mixture into a small baking dish and chill in the refrigerator for at least an hour. Remove the baking dish and scoop out balls with a spoon or melon baller. Use your hands to form the truffles into an oblong shape. Allow the truffles to set for at least 30 minutes.
Chocolate Cigarettes:
Melt white and dark chocolates in double boilers or bowls over pots of simmering water. Pour white chocolate onto a work surface. You can use the back of a chilled baking sheet or a cool counter. Spread the white chocolate into a long, paper-thin sheet with a palette knife. Allow the white chocolate to harden slightly. It should feel dry when you touch it. Move a combscraper across the sheet towards you to draw lines. Since I didn’t have the proper tools, I drew lines with a butter knife. (That’s why they look a little funny.) Pour dark chocolate over the white chocolate lines and spread over into a thin sheet. Allow the chocolate to harden until it feels dry to the touch. Clean up the edges so they are straight. Push the palette knife up under the chocolate at an angle. Push the knife through the chocolate and back to make the cigarettes. Allow the cigarettes to rest until completely hardened.
Chocolate Disks:
Melt chocolate in a double boiler or a bowl over a pot of simmering water. Line a baking dish with parchment paper. Place large round cookie cutters on the dish and pour chocolate into cutters until you’ve reached your desired thickness. Tap the dish on the counter to remove any air bubbles. Chill the chocolate until it’s set. Gently tap the dish to remove the chocolate from the cutter. Chill the disks until assembly. You can also pour the chocolate straight into the baking dish, chill, and cut out shapes with a cookie cutter that has been heated.
Stars and Pink Heart:
Melt white chocolate in a double boiler or a bowl over a pot of simmering water. Use the same method as the chocolate disks to achieve the desired shapes. Before making the heart, add a small amount of pink food coloring to some of the white chocolate. Chill shapes until assembly.
Crosshatch Heart
Melt white chocolate in a double boiler or a bowl over a pot of simmering water. Mix in a small amount of yellow food coloring. You can use a spatula or fork to drizzle chocolate on parchment paper in a crosshatch pattern and cut out the heart shape. You can also pipe out thin lines of chocolate into the crosshatch pattern and cut out the heart shape. They are delicate so be careful. (Mine broke so many times I had to settle for drawing the pattern on a solid piece of chocolate.) Chill heart until assembly.
Putting It All Together:
Place your cake on your desired base, cake board, or plate. Pipe chocolate mousse onto the cake. I opted for small blobs that sit close enough to squish together. Place a chocolate disk on top of the mousse. Pipe the white chocolate mousse on top of the disk and cover with the second chocolate disk. Be careful not to sandwich the disks and mousse too much. (That’s why my bottom layer isn’t too happy.) Pipe a small blob of white chocolate mousse in the center of the top chocolate disk. Place strawberries, truffles, and stars in front of the blob. Place the pink heart and the crosshatch heart behind it. Stick the chocolate cigarettes out next to the crosshatch heart. To keep the decorations in place, I glued them down with a little melted chocolate and a bit of leftover mousse.
Variations:
I assumed that the fillings were mousse, but I could be wrong. You can use marshmallow, cheesecake, panna cotta, or anything you want. You can also use other decorations, like regular chocolate pieces in place of the truffles.
Rinko must REALLY love Takeo because there’s a lot of work involved to make this towering chocolate. At least I got to try some of it. Rinko doesn’t even watch Takeo eat it. She’s feels rewarded just by giving it to him. She even apologizes for making mistakes. And that makes Rinko a much better person than I am. Not to mention that Takeo just wanted any chocolate from Rinko and was already satisfied with the cookies he’d gotten. He was already on his way out to buy her some expensive chocolate in return. Even though he wasn’t expecting anything else from Rinko, he was overjoyed and made sure to savor every bite. They’re just too cute! The couple is perfectly imperfect and show that love is difficult, but it’s the silliness and over-the-topness of it that makes it worthwhile.
I am a PokéManiac. Been one since the day I got my hands on Pokémon Red and Blue. After that, I played all the games, collected the cards, bought as many toys as I could, and watched the show religiously. But none of that could’ve prepared me for what would become one of the best nights of my life. The night I saw Pokémon: The First Movie. My aunt took all five of us kids (her two and my crew) to the theatre on opening night. There was a huge cardboard display and someone dressed as Pikachu to take pictures with. Of course I couldn’t pass that up because Pikachu’s always been my favorite. We got so caught up in the excitement, the movie started without us. I was so hyped up watching Pikachu’s Vacation, you would’ve thought my bucket of popcorn was a bucket of pure sugar. Once we got to the birth of Mewtwo, I’m pretty sure I stopped breathing.
When we finally got to Ash and the gang, I felt like I was meeting them for the first time all over again. Ash was goofing off while Misty was keeping busy. And there was Brock whipping up his famous Lazy Boy No-Chew Stew. Even with my mouth stuffed with popcorn, I wanted to dig in then and there. I felt like poor, hungry Team Rocket. I’ve had to endure this every time I’ve watched this movie and I’ve finally had enough.
Recipe makes 5 one-cup servings.
Ingredients
2 tablespoons olive oil
1 pound chicken or beef, chopped
1 onion, finely chopped
2 cloves garlic, minced
3 carrots, chopped
2 large potatoes, peeled and chopped
1 broccoli stalk, cut into small florets
2 ½ cups chicken broth
4 tablespoons butter
6 tablespoons flour
2 cups milk
4 tablespoons cream cheese, room temperature
Salt
Pepper
Directions
Heat olive oil in a large pot over medium-high heat. Add onions and cook until translucent. Add garlic and cook for 30 seconds. Next, add chicken and sauté until it begins to brown. Add carrots and potatoes and cook for two minutes. Then add chicken broth and reduce the heat to low. Simmer until the vegetables soften.
While the stew is simmering, make the roux. Melt butter in a medium saucepan over medium heat. Add the flour and whisk constantly. As the mixture starts bubbling, whisk in the milk. When the mixture begins to thicken, reduce the heat to low. Add the cream cheese and cook until the sauce is thick, still whisking. Remove from the heat.
Add the roux to the stew and stir to fully incorporate it. Increase the heat to medium and add the broccoli. Simmer for 5 minutes and add salt and pepper to taste. Remove from the heat and serve!
I walked out of the theatre that night with tears in my eyes and a smile on my face. Each time I re-watch this movie, I relive that night and the rollercoaster of emotions. I really did go on that journey with Ash and friends. I’ve got a great big bowl of stew to prove it.